
I’m not sure if this is your sort of “candy” store but it is mine…
The Smock Shoppe!
I find few things in life more rewarding than taking a piece of fabric and making it into something wonderful for my little rovers. And this is one of my go-to places!
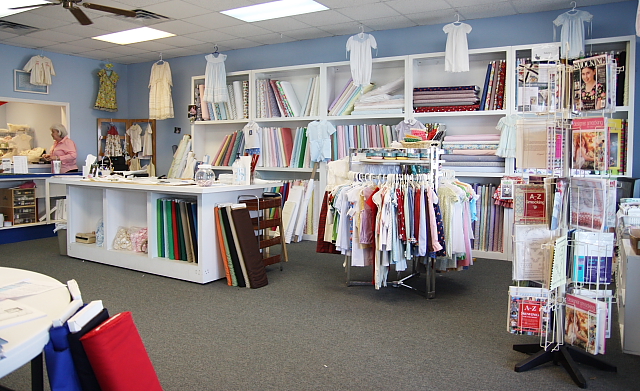
Not only can I spend money there, I can also spend a LOT of time; planning, thinking, creating, coordinating… it’s an incubator for my right brain. Last year I showed you Bill’s Hardware/Simply Unique {another one of my sewing gold mines} and this one is similar but geared more towards sewing for children. The Smock Shoppe specializes in all things related to children’s sewing; patterns, fabric, the finest lace, and anything in-between you would need to create something special for a little person!
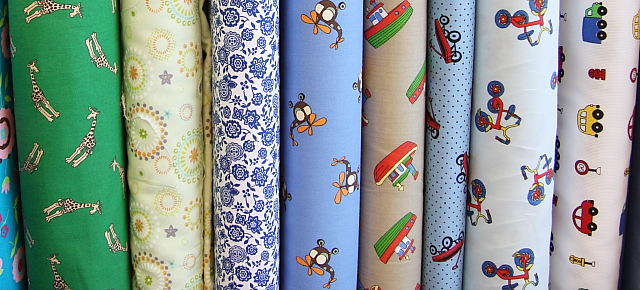
They carry fun & funky and prim & proper!
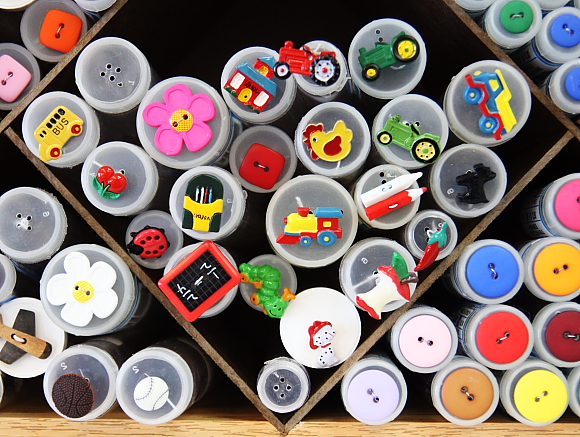
And all the accouterments…
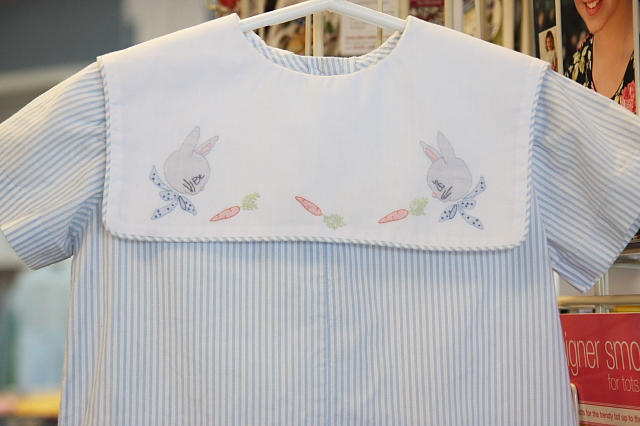
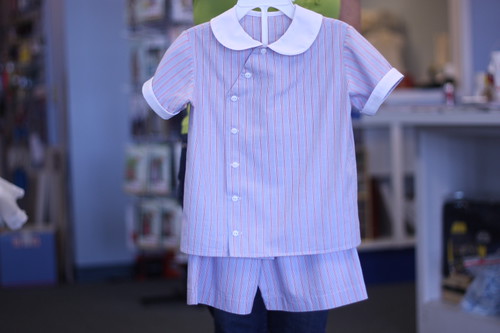
My last few trips in have been both to the benefit of the little Rover…

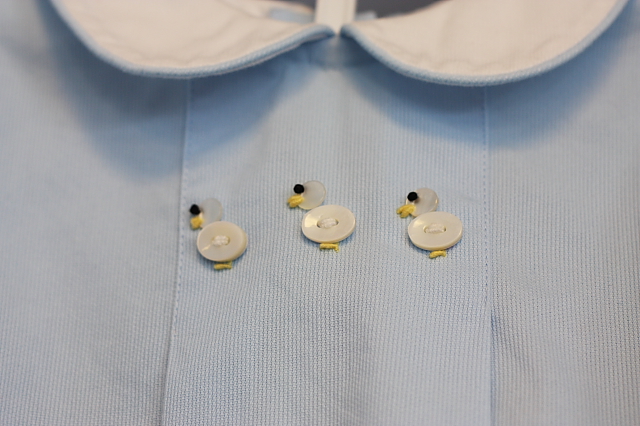
And his sisters…

My go-to pattern for shorts {boys & girls} is Diaper Shirt and Shorts by Creations by Michie. It’s an incredibly easy pattern and I love that the shorts have no side seams, only two identical pattern pieces!
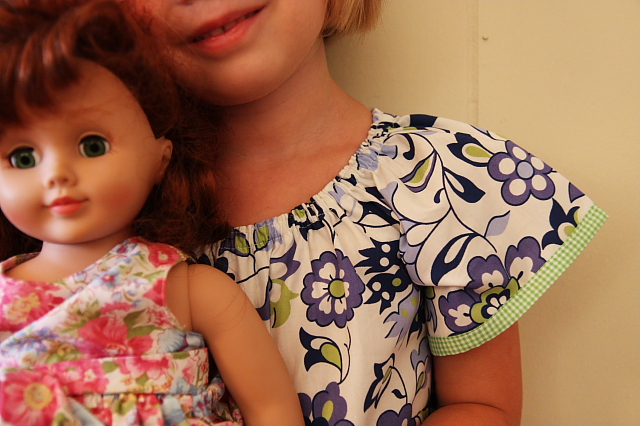
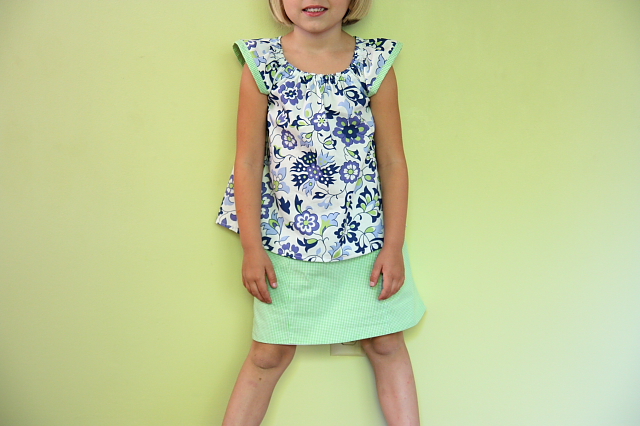
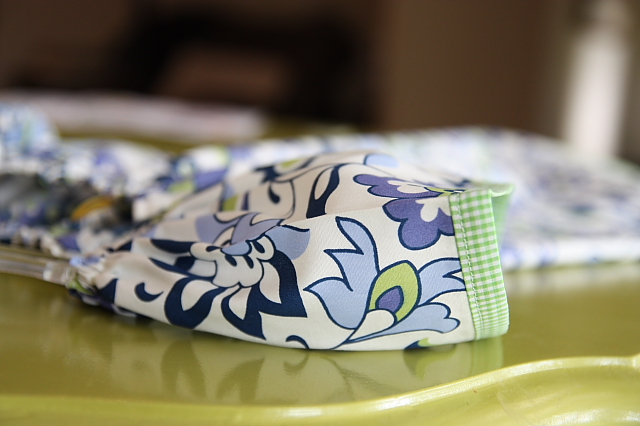
Pictured on Morgan & Paige {above} is a new pattern that the Smock Shoppe just got in… Ofelia by Figgy’s Patterns, which is quite similar to Simplicity’s 5118 {that many of you email me about regularly}. The Simplicity pattern is unfortunately out of print but the Ofelia pattern is just as easy and with a few minor modifications* you can get the same angel sleeve that is on the Simplicity pattern! With one yard {60″ wide} of fabric I made Morgan a size 6 blouse with a modified sleeve and Paige a size 3 dress {with length taken off the bottom}. I used Katie’s Skirt pattern for Morgan’s skirt and I LOVED IT!
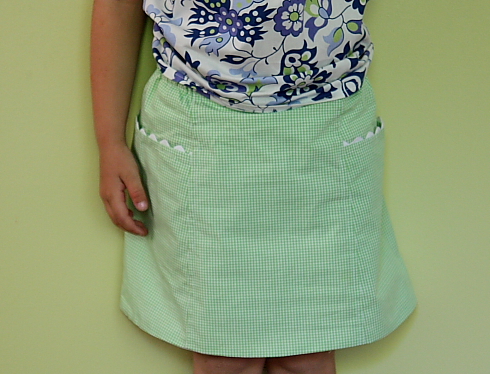
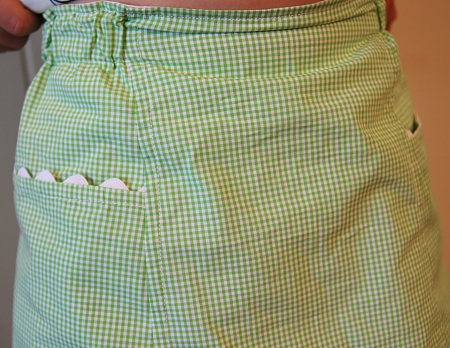
The skirt is fully lined and has elastic casings on the sides only and two adorably trimmed side pockets. She loves this skirt and I do too! The length is perfect for little girls, the pockets make her day and it’s so easy! {No modifications were made, besides adding a “5” so she would know front from back and so I would know the size. } Although I did notice the last step wasn’t clear– you have to pull the skirt through the opening in the side of the lining to sew the bottom hem— otherwise you’ll end up with a giant tube, not a skirt, I learned this the hard way. I could make at least 6 more of these for summer!
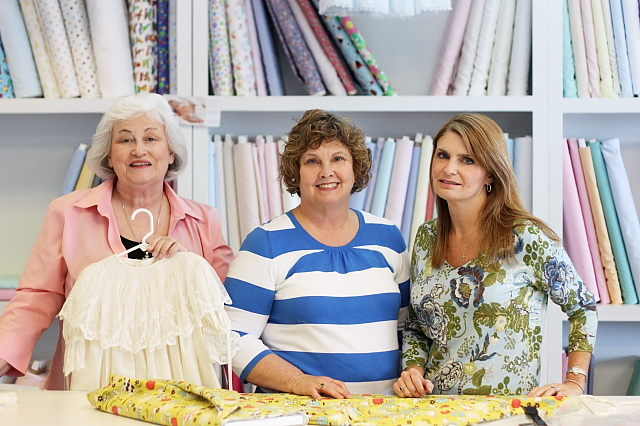
Ok, back to the shop {where ALL these favorite patterns can be found}! The Smock Shoppe ladies are always kind and willing to help with patterns, assist with fabric selections… and begrudgingly pose for a picture! 🙂 Mary Strickland {shop owner [above on left] & queen of all things sewing– play clothes or the finest heirloom}, Dianne Whitehead & Jennifer Watson {shop employee [above on right] and incredibly talented seamstress, heirloom sewer, and “sewing for little boys” expert} have all been so patient with me. You see, I started this post last JUNE when I attended a lace show. 🙂
… and fully intended to follow my visit with a post… and now here I am nearly 11 months later!
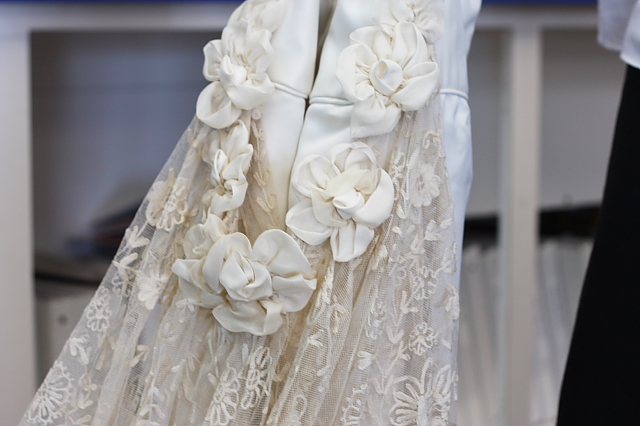
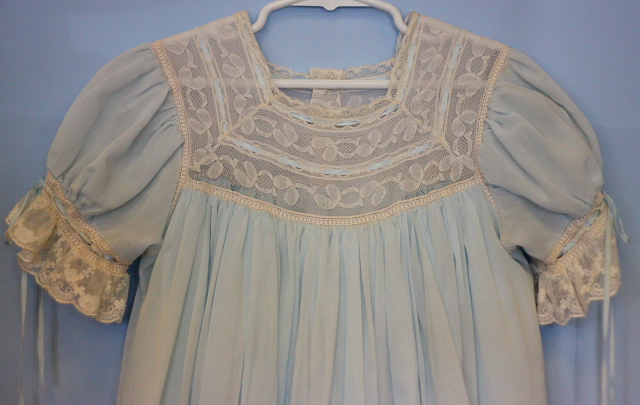
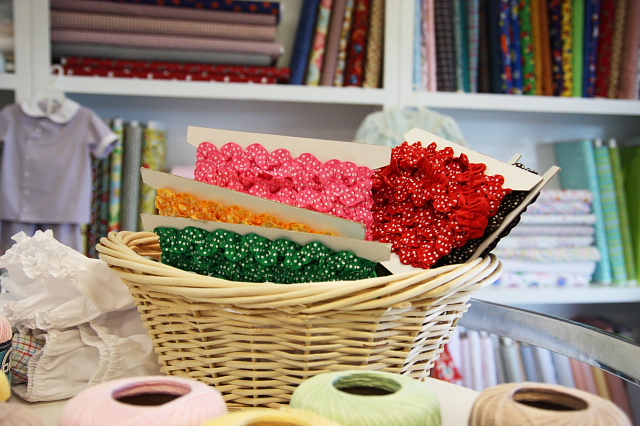
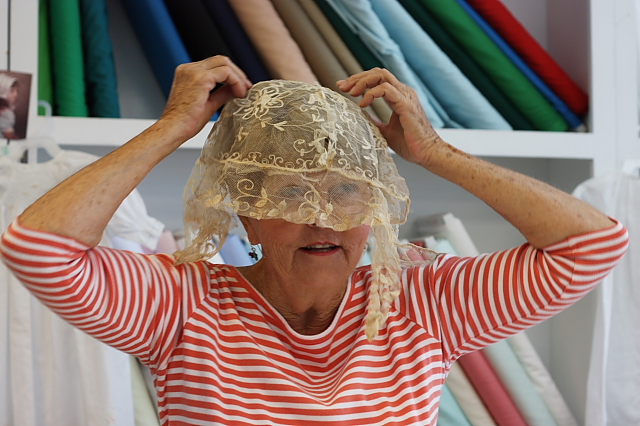
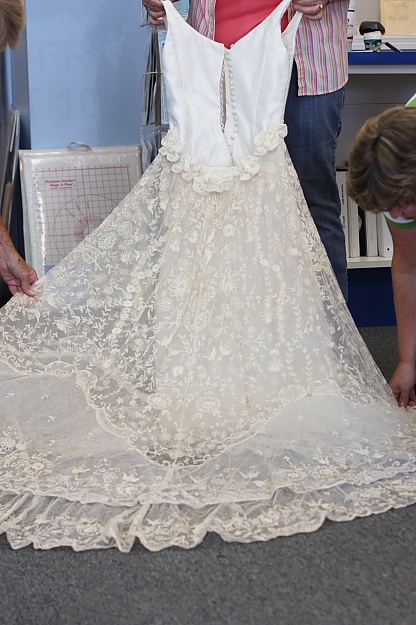
The show was wonderful and I was mesmerized with what I saw! The children’s heirloom pieces were gorgeous but this wedding gown captivated me. This is a simple satin wedding gown with a train made of the lace from the bride’s grandmother’s wedding veil… it was breathtaking! And a very creative way to incorporate an heirloom piece with a modern gown!
Various outfits line the walls… each one is carefully handmade and they always spark my interest and creativity!
They also carry a great selection of outfits already made or ready to smock and a HUGE pattern collection! Mary has been in business for 32 years and clearly her expertise is invaluable. They have a NEW blog where they showcase new patterns, new fabrics, class schedules and class details {everything from smocking to basic sewing, to hand sewing, to tatting} and they also offer great discounts! Mary is willing to ship if you see something you like and aren’t local!
Now… for PATTERN talk. Jennifer helped me pull some patterns… some are my favorites, some are hers but all are GREAT! So if you need some inspiration and don’t know where to start… this is a collection in my FLICKR account to showcase a stack of children’s sewing patterns! And you can click on individual pictures for larger/closer views.
- An easy pattern for beginners with a BOY & GIRL jumper pattern: Holly & Hunter by Bonnie Blue
- Another moderately easy pattern for little girls {I’ve made view 2 for the girls}: Sophia by Bonnie Blue
- Also love Shelby Kate by Bonnie Blue {I’ve made view 1 without pockets}
- My friend Tami has made and I’ve seen and LOVE this top as a dress or top… Sophie by Maja’s Heirlooms
- Jennifer loves {and I’m going to make for Rover w/o smocking in short version}: Donald by Maja’s Heirlooms {the side pockets are so fun}
- Jennifer also recommended for little boys: Toddler Romper by Creation’s by Michie
- I love and use: Jillian by Bonnie Blue for my PANTS pattern for JM and girls {I add a ruffle for the girls.}
- This is a very easy and simple pillowcase dress, I’ve been known to modify and morph a pillowcase dress into a halter style dress for the girls and the back. 🙂 The fabric on the girls dresses came from Simply Unique.
- I have always LOVED Frannie & Frannie Baby by Children’s Corner for little girls. There is one tricky step that requires you roll the neck up into the arm to sew the sleeve but besides that it’s pretty straightforward!
This is really only scratching the surface, there are many more in my flickr group and TONS more in the shop. I will try to be better about sharing patterns because some of you seem to be interested!!
Thank you, Mary for your commitment and dedication to teaching women of all ages how to sew for their children, grandchildren, nieces and nephews! It is always a pleasure to walk through your doors, I’m always inspired and never leave empty handed! And… thank you to my mother and my precious friend Tami {past shop employee} for teaching me basics and the not-so-basics of sewing. I am forever grateful!!
*Modifications made to Ofelia for the girl’s dress and blouse above.
- For the neck: I didn’t use a bias strip to make a casing. I simply added {before cutting out} 1/2″ to the top of the neck line, surged the raw edge, and turned it down to create a casing. I feared that adding a bias for a neck casing would add more bulk and prevent the dress from gathering the way I intended for it to.
- For Paige’s dress: I took about 3 inches off the length. I also added a coordinating piece of fabric around the bottom of the dress.
- For Morgan’s angel sleeves: You can create an angel sleeve by measuring 3 1/4″ inches up from the bottom of the sleeve cutting line and cut it off. This will create an angel sleeve… I then banded it as the pattern instructs like I did on Morgan’s with the lime check. When constructing the dress you will need to use a bias strip or single fold bias tape to finish the inside of the arm hole because the sleeve will not cover the inside/underside of the armhole. I followed the instructions for the angel sleeve construction on the Simplicity pattern.
mary katharine
April 23, 2010 at 5:58 amOh how you remind me of how I’ve always wanted to sew!! My mother grew up watching her mother and aunt make all of her clothes (as well as her siblings). But she tells me that while watching one day, her aunt sewed right over her finger and just paused and pulled out what she had done. Apparently her aunt was okay, but it left Momma with a desire to do anythign but sew. THUS, I did not grow up in a “creative” environment of such. Maybe after I tackle the Army Ten Miler, I’ll move my focus to learning how to sew. How I’ve not tackled this thus far, I’m really not sure, but I’ve still got a couple of little people that it would definitely be worth the investment. And if I can start running at 36, I’m sure I can start sewing at 37! Thank you for starting to pull all of your patterns/ideas together for all of us. You definitely inspire and help me keep the wheels turning in my head.
Lillian - Domestic Simplicity
April 23, 2010 at 6:08 amOH my gosh – what an amazing store!! If I lived closer I would SO love to take a beginning smocking class!! Love those wagon shorts:)
Emily
April 23, 2010 at 6:38 amWhat a wonderful shop. Thanks for the inspiration and pattern ideas. I’m sewing for 3 little grands and am always looking for new patterns and fabrics. I am so jealous that you have at least 2 local shops with wonderful fabric and helpful seamstresses! I’m on the northeast side of Atlanta and there is nothing like your great shops!
Katie
April 23, 2010 at 7:14 amOH! This post is making me so excited! I loved the little wagon/dotted fabric on the bolt, and then when I saw the shorts you made….so excited. The tugboat fabric is also very sweet. I’m so thankful you posted about that shorts pattern. Jack needs some shorts this summer, and I’ve been looking for one I like. The button ducks….who thinks of these things?! My creative juice well does not run that deep… goodness….adorable….
natalie @ this old southern house
April 23, 2010 at 7:24 amwhen mary margaret was born my mother and i called EVERYWHERE looking for someone who could teach us to smock–and you think we would find a place in atlanta, wouldn’t you? but nope. we ever called retirement homes! nope.
this shop looks absolutely fabulous and i wish i lived closer! (please tell me you’ve taken that tatting course…oh my lord, my granny used to do that and i would LOVE to learn!)
kendall boggs
April 23, 2010 at 7:26 amHey Darbs! I’m so excited you posted this!!! My mom Pat Callaway worked there for years until last year. Mary is a good friend of ours! Great shop and mom thoroughly enjoyed working with all the young girls that came in!!!
Brittaney
April 23, 2010 at 7:38 amWhat a great place! My mom and I recently discovered a shop similar to this in Auburn. Unfortunately, it doesn’t have nearly as much fabric as the Smock Shop does. That red wagon fabric is just precious!
Ellis
April 23, 2010 at 7:49 amI have been a reader for awhile but don’t think I have ever commented! We have a similar store in Mobile if you are ever over here… https://www.peanutbutter-n-jellykids.com/ I recognized a lot of the same fabrics! I found the cutest sock monkey flannel there…it can be seen here: https://www.peanutbutter-n-jellykids.com/shop/fabricsflannels.htm
I am itching to sew someting but am trying to wait until I know whether I need to sew for a boy or a girl (I’m 36 weeks pregnant now). I’ve made a few blankets and burp cloths, but am ready to sew some little dresses or john-johns!
Have a good day. 🙂
Paula
April 23, 2010 at 7:51 amOh how I wish I had a store like this nearby! And how I wish my youngest didn’t just turn 9. She’s not into the sweetness like this anymore so much. Adorable stuff!
Champagne Maker
April 23, 2010 at 8:00 amDarby! Do you knit? I would do just about anything if you’d send me your kids sizes (predictions for fall) so I can add 3 little sibling sweaters to my Stitch Poet pattern line. If I sent you the samples, you could keep the sweaters if you sent me photos of your littles in them to use on the pattern cover! PLEASE, OH PLEASE!!!! Email me if you would be interested 🙂 (h2ocolor@perigee.net)
Dina
April 23, 2010 at 8:06 amThank you SO much for sharing this post! I have just started to sew and am having trouble finding boy patterns-I love the shorts and rompers patterns and am going to call and order mine today! Heck, I might even make a trip over to Dothan one day to check out this amazing store-thank you!
Katharina
April 23, 2010 at 8:23 amThis looks like an awesome shop! There is so much love put into the design and the little details – the ducks are cute! Sometimes I am all motivated love to spend time in a shop picking out fabric, matching differnt patterns and then don`t find the time to sew and the fabric sadly ends up in some box 🙁
So you are definatly an inspiration! Getting all this sewing done with three kids around.
Liz
April 23, 2010 at 8:37 amThat is so lovely. I really need to work on my sewing skills so I can make cute stuff for my kid(s) too!
Mama Bean
April 23, 2010 at 9:02 amI love you for using accoutrements. Best word ever 🙂 I wish I could sew, but for now, I’ll just enjoy your posts about it (ducks made out of buttons. AWESOME!)
Anna
April 23, 2010 at 9:08 amHeaded over there today to pick up a precious smocked bubble being put together for Elle. I can smock it, but wish I could sew it- want to teach me?! I’ve trid, but I’m not patient enough. I could spend all day in there!
Megan
April 23, 2010 at 9:16 amOh my…..I would be at this store every week if I lived closer. (And my husband is now glad that we don’t live closer.)
Please, please, please tell me about the duck buttons. I may have to come up with a new project just to put them on something. Did you take a closer look at them?
Alice
April 23, 2010 at 9:18 amWOW! Such a beautiful shop!! Mary has the “gift”. The clothes she has made for my grandchildren are so gorgeous!! She is such a super lady! Love her!
kendall boggs
April 23, 2010 at 9:23 amDarby, just found this out from a blog that I follow. Please help me get a prayer chain going for this sweet family. Thank you!
https://allthisandmore.typepad.com/allthisandmore/
Jacci
April 23, 2010 at 9:27 amI’ve never lived farther south than Virginia, but I sooooo miss the South. Smocking is rare here, but I still hold on tenaciously to my girls’ gigantic BOWS 🙂
Tara
April 23, 2010 at 9:27 amI have laid aside my sewing love for our house renovations, and your post is making my heart almost burst! I’ve got to get back at it. Love the patterns! Also haha, we like to call my personal style “Granny-Glam” it sounds much more appealing than Geriactrical (I wear a cardi even in the summer).
Meredith
April 23, 2010 at 9:28 amWe go to church with Mary Strickland. She is SO wonderful!!
natalie
April 23, 2010 at 9:28 amyou may or may not have gotten my email, but you answered my question 🙂 i have tons of patterns but still havent found one i love for shorts. thanks for the tip! we have a store that looks exactly like that in mobile called peanut butter and jelly kids. always such a treat to browse through there…
Denise
April 23, 2010 at 10:11 amDarby, I have no doubt that if you lived closer to Atlanta, you and my daughter, Natalie(@this old southern house) would be best friends. You remind me so much of each other. There is nothing that you two can’t do. Where do you find the time??? I keep MM for Natalie(a teacher) and I can’t seem to get anything done. I so LOVE your blog!!!! You are one talented person. Have a wonderful weekend.
Janna
April 23, 2010 at 10:33 amBeautiful pictures! I am so in love with your daugther’s blue/green flowered dresses; I want one for myself 🙂
One of my biggest regrets since becoming a stay at home mom is that I never learned how to sew… 🙁
beki
April 23, 2010 at 10:38 amAll the clothing is so adorable! I need to get my butt in gear because Ava has a birthday in a week and I have yet to make a drees. I may pull out my trusty ole Simplicity 5118!!
Summer Riley
April 23, 2010 at 10:41 amlove your pattern choices!! Frannie has been one of my favorites (although everytime I pipe it I think.. never again) Have you tried the new Oliver and S designs yet? I worked a few of them and they go together quick quick quick with professional (yet easy!) finishing techniques. I have enjoyed following your blog, you have such great talent and zeal for family life. Keep up the good work!!
Jennifer
April 23, 2010 at 10:49 amDarby, My sweet boy’s outfits look precious and the post is fabulous! Thank you again! We have hooted about the picture of Sally; so much fun!
Abby Maddox
April 23, 2010 at 10:59 amI love Mary and the Smock Shoppe! I have lots of childhood memories from when her shop was locataed over by First Pres. Mom and I used to stop in on our way home from pre-school. Another reason to move back to Dothan 🙂
pam
April 23, 2010 at 11:31 amdarby, you are so talented! the clothing you make is beyond adorable. i just bought a sewing machine and am trying to dredge up what i learned in 7th grade home ec. hopefully i can just turn the machine on! pam
Michie'
April 23, 2010 at 12:13 pmLove the pictures of a wonderful shop! Thank you so much for mentioning my patterns.
Creations By Michie’
julia
April 23, 2010 at 2:10 pmWow – thanks for the fab reviews! I’m going to try the Katie Skirt. #3 was asking me the other day to make her something and I think that skirt is the perfect thing.
Holly
April 23, 2010 at 3:31 pmOh wow! I have got to visit this place. I have been wanting to make my two little monsters some shorts for this season. Love the posts! And I can’t stop going back to that beautiful blue heirloom with the lace. Too bad I don’t have any girls.
Melise
April 23, 2010 at 3:36 pmYou are so amazing~ This post must have taken you SO long! I love the Smock Shoppe! There’s nothing like it! Thanks so much for this, I’m sure I’ll reference it for years to come.
Mary Elizabeth
April 23, 2010 at 4:58 pmLove this post!!
I used to sew fanatically …maternity clothes, toddler clothes, and some pre-teen things, then I stopped!!
Suddenly my children were wearing trends I couldn’t keep up with, so I laid my machine to rest {although Halloween costumes kept me busy!}. I cannot wait for grandchildren for so many reasons…and sewing is one of them.
God Bless you and your family, I truly enjoy your blog!
M.E. @ FeatheringAnEmptyNest.blogspot.com
Whitney
April 23, 2010 at 8:15 pmI wish I were close to this shop! It looks so cute and I’m a beginner so I could use some classes and directions. Thanks for the pattern recommendations. I have made a jumper similar to the Hunter but have been wanting to try something else. Now I know what I can try! Thanks!
melissa stover
April 23, 2010 at 11:13 pmi have had the sewing bug lately but i am such an amateur. i have to rip seams almost as many times as i sew them.
Renee Hargrove
April 23, 2010 at 11:29 pmAmazing. I really should have let Mom teach me how to sew; incidentally,we would never be able to get her out of that store.
rhonda
April 24, 2010 at 12:03 amOh, I am drooling over that shop! I am a fabric-holic! And unfortunately my girls have gotten bigger an its harder and harder to find cute patterns for them (sadly, its when you NEED to sew- the clothing in the stores are horrible. Finding a non-hoochie mama bathing suit for my *8* year old is starting to be a struggle. sigh) Enjoy the shop, and I remember the skirt pattern. There is a similar one that is skorts- a skirt with attached shorts. My girls are rough and tumble and like to flip on the playground bars- this way they didn’t have wear shorts under thier skirts (school rule). I’ll try to look it up and send it to you. It was easy and cute.
Have fun. and put them in matching outfits NOW as long as you can!!!
Dina
April 24, 2010 at 8:35 amMy goodness, with all these Atlanta girls here, we all need to caravan over to this store together-how much fun would that road trip be!!
Anna
April 24, 2010 at 10:26 amLOVE LOVE LOVE this!!!!!! Thank you sooooo much for sharing. Next time we are at Rucker, def stopping by here to spend some time and $!!!!!!!
Cath
April 24, 2010 at 11:44 amThis is one of those posts in which MDH is sooooo thankful we don’t live near Darby. He has just breathed a huge sigh of relief cause I CAN’T GO SHOPPING THERE!!!
(ya just never know when I’m gonna make a trip to visit friends, ah hah!)
thanks Darby, adding this to my list of journey tours.
Gloria
April 24, 2010 at 2:57 pmNow, I need to learn how to sew!
Jessica M.
April 24, 2010 at 3:02 pmThis gave me some much-needed inspiration to try AGAIN to sew…not in spite of the little people in my life, but because of little people in my life. 🙂
Traci
April 24, 2010 at 5:06 pmDarby,
I’ve commented and said this before, but I LOVE your blog. It’s always one of the highlights of my day to read your posts and see your fabulous pictures. Such a lovely fam! You have so many talents that I envy. I’ve tried sewing but the only thing I have enough patience to complete moderately well are pillows. Everything else frustrates me and ends up looking horrible! Very jealous of your skills. 😉 Looking forward to your next post!
~Traci
Iana
April 24, 2010 at 9:34 pmI seriously think that the Chamber of Commerce should pay you! Your Kid in a Candy store posts are making me think that I need to convince my hubby to find a new job in Dothan =) Or at least plan a major shopping trip down that way ASAP! Such wonderful posts…… I would love to go to The Smock Shop!!!
Renee Smith
April 24, 2010 at 10:21 pmI am a beginner that started with some mini-hammer-pants for my son for halloween, and I am hooked. I slipcovered a rocking chair for him a couple months back, and I am dying to do more (I have to borrow my mom’s machine currently, but I’m hoping to get one for my birthday or that my mom will tell me to keep hers at my house until she needs it). Those shorts are SO CUTE! I was worried that I wouldn’t be able to make anything for my son out of fear of it looking too girly, but I am proven wrong! Thanks for the info!
Brandi
April 25, 2010 at 6:39 amI just signed up for my first sewing class. I have wanted to for a long time, but after reading this post, I just went and did it. Sometimes you wonder if there is ever enough time, but you just need to make it I find.
In many different ways, you inspire me to be a better mother. I’ll guess there are many others that feel the same.
Thank you.
Melanie Gore
April 25, 2010 at 7:20 amYou are so talented! I love me some fabric and love to go look at it but I can’t sew anything!
tyne
April 25, 2010 at 5:23 pmLove all the stuff, but I am especially glad that Darby doll made it into the post.
Kelly@TearingUpHouses
April 25, 2010 at 8:40 pmAw, I love the little button details.
Kelly
Beki - TheRustedChain
April 26, 2010 at 10:44 amI don’t sew at all so I can’t comment on that. But I love that someone else starts a blog post and then finally gets back to it 11 months later. 🙂 I have some from last summer still waiting to be finished.
Jo
April 26, 2010 at 12:49 pmYou’ve totally inspired me to start sewing again! I love the shorts! The red wagon fabric is adorable! I don’t live anywhere near The Smock Shoppe. Can you tell me the name of the fabric or who makes it?
Mrs. R
April 26, 2010 at 3:06 pmThe dresses you made are so adorable! It is great to find other bloggers that love to sew!
Staceyn Meredith
April 26, 2010 at 3:09 pmOk – so this post was really eye candy for me! So much so that I headed right to my smocking shop and got some patterns and fabric. How about a nice Riley from Bonnie Blue Designs and a sweet Frannie by Children’s Corner. I got stuck on that arm hole/sleeve thing and went on YouTube only to find a video from Children’s Corner themselves on how to do that. 2010 sewing – video chat and YouTube make life so much easier!!!!
Tara
April 26, 2010 at 9:15 pmCandy…this is more like my crack…I’m much more heavily addicted to sewing stores than to compare it to a candy addiction! I have 2 places that feed my need in my area and I have a hard time walking in without walking out with a few things to add to my list of things to sew. I do smock…which I love and highly recommend to all friends…but I have learned that sometimes it’s just better to pay for a smocked dress…the hefty price tag is there for a reason…it’s hard work! But I do love to crank out some cute ruffle pants/capri’s and matching appliqued shirts on any given saturday afternoon…I love a quick project!
Monogram Chick
April 28, 2010 at 10:49 amNext time you’re in Birmingham check out The Smocking Bird in Homewood….you’ll love it too! 🙂
Shelly Figueroa
April 30, 2010 at 9:19 pmThank you for highlighting the “Ofelia”!
Beautifully put together. Terrific fabric choices.
What a gorgeous blog you have here!
I have to say I’m quite jealous of your girl getaway!
So nice to have a good group of Christian gals to walk through life with.
Frequent visitor
May 27, 2010 at 5:06 pmIs there any way that you could link this post to the “sewing” category on the right hand site of your blog? I think this is an excellent post on sewing and patterns and would love to be able to find it for years to come! Thanks!
Carolyn
June 4, 2010 at 10:58 amCourtney sent this to me (I am Courtney’s mom). I am going to print it out and save all the valuable info in this post. I have a similar shop here in Baton Rouge that is my “go to” when sewing for my grandson. With two more grandchildren on the way, I will be quite busy and appreciate all the photos. Thanks for sharing! Great post!
Bec
February 3, 2011 at 9:38 amWho makes that wagon fabric??
Mary
February 14, 2011 at 3:24 pmPlease do tell…who makes the adorable wagon fabric?
weblink
July 13, 2013 at 5:11 pmEvery weekend i used to visit this site, as i want enjoyment, since this this web site conations in fact good funny stuff too.
Feel free to surf to my web blog weblink
realestatelawyer
October 17, 2013 at 7:21 amWow! i’m so glad that if found your blog I will be saving this for later!
– real estate xiamen is an interest of mine and and your
“Like a Kid in a Candy Store take 3 | Fly Through Our Window – Fly Through Our Window” article is absolutely good work.
keep up the great work, I’ll check back again soon!
My website: realestatelawyer